Schema design basics / Hasura ドキュメント翻訳
Tweethttps://hasura.io/docs/1.0/graphql/manual/schema/basics.html
Schema design basics
Table of contents
- Create tables
- Try out basic GraphQL queries
Hasura GraphQL engine は、Potsgres database へ tables/views が作成された瞬間に、GraphQL schema object type とその object type に一致する query/mutation fields、さらにその query/mutation を処理するための Resolver を自動的に作成します。
The Hasura GraphQL engine creates GraphQL schema object types and corresponding query/mutation fields with resolvers automatically as we create tables/views in the Postgres database.
ここからは Hasura console を使ってどのように table を作成するのか、そして table を作成することによって Hasura が生成する GraphQL schema がどのようなものなのか見ていきましょう。Hasura console はこの目的のために最適な UI ツールです。
Let’s take a look at how to create tables using the Hasura console, a UI tool meant for doing exactly this, and the GraphQL schema it generates.
二つの簡単なテーブルを作成したいとしましょう。一つは article で、もう一つは author です。それぞれ以下の schema を持たせることにします。
Let’s say we want to create two simple tables for an article/author schema:
author (
  id SERIAL PRIMARY KEY,
  name TEXT
)

article (
  id SERIAL PRIMARY KEY,
  title TEXT,
  content TEXT,
  rating INT,
  author_id INT
)
Create tables
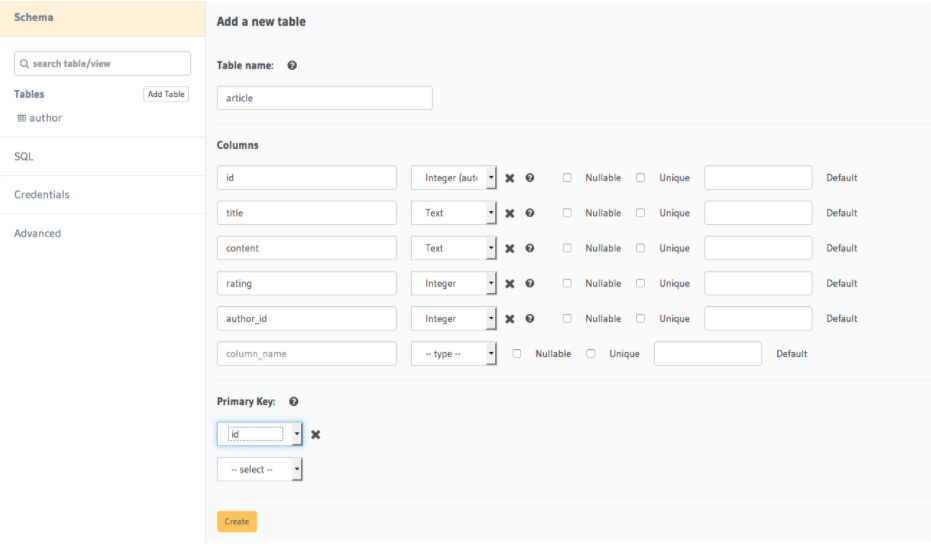
Hasura console を開き、Data tab に移動し Create Table ボタンを押しましょう。すると、テーブルを作成するためのインターフェイスが開きます。
Open the Hasura console and head to the Data tab and click the Create Table button to open up an interface to create tables.
ではこのインターフェイスに、今回作るテーブルのための schema を入力していきましょう。完成すると以下のようになるはずです。最後に create ボタンをおしてテーブルを作成しましょう。

For example, here is the schema for the article table in this interface:
テーブルが生成されるとすぐに、そのテーブルに対応した GraphQL schema type と query/mutation resolver も自動的に生成されます。
As soon as a table is created, the corresponding GraphQL schema types and query/mutation resolvers will be automatically generated.
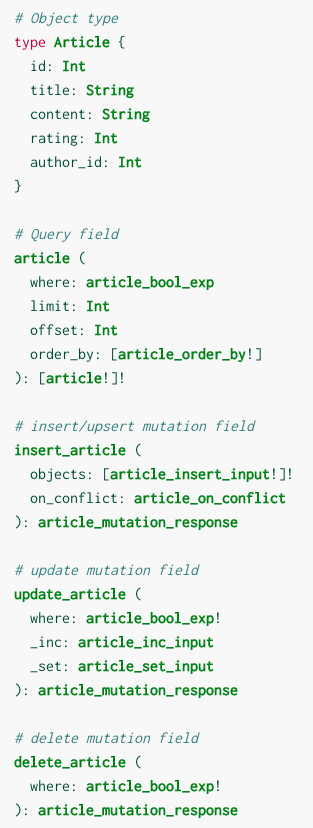
以下の一覧が、今回作成した article テーブルに対応して生成された object type and query/mutation field です。

The following object type and query/mutation fields are generated for the article table we just created:
全ての機能について知りたい場合は Query API リファレンス と Mutation API リファレンス を確認ください。
See the query and mutation API references for the full specifications.
サンプルデータを追加したい場合には、作成したテーブル内にある Insert Row タブから実行することができます。
You can insert some sample data into the tables using the Insert Row tab of the created tables.
Try out basic GraphQL queries
上記の作業をおえましたので、作成したテーブルに対して GraphQL queries/mutations を実行することができる状態になりました。Console から GraphiQL tab を開いて実行しましょう。(ただしその前にサンプルデータをテーブルに対して insert しておいた方がいいでしょう。)
At this point, you should be able to try out basic GraphQL queries/mutations on the newly created tables from the GraphiQL tab in the console (you may want to add some sample data into the tables first).
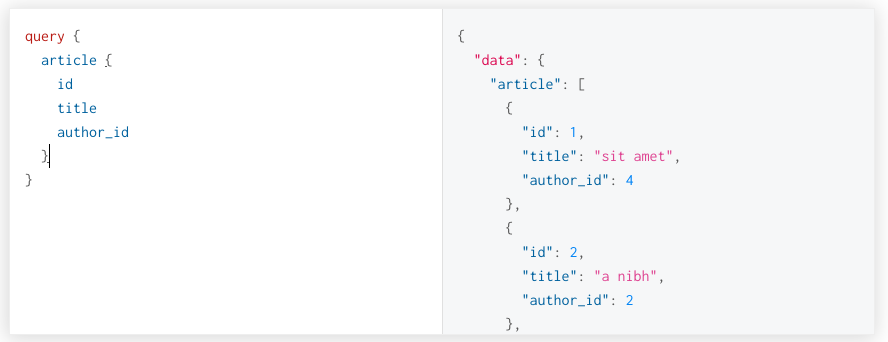
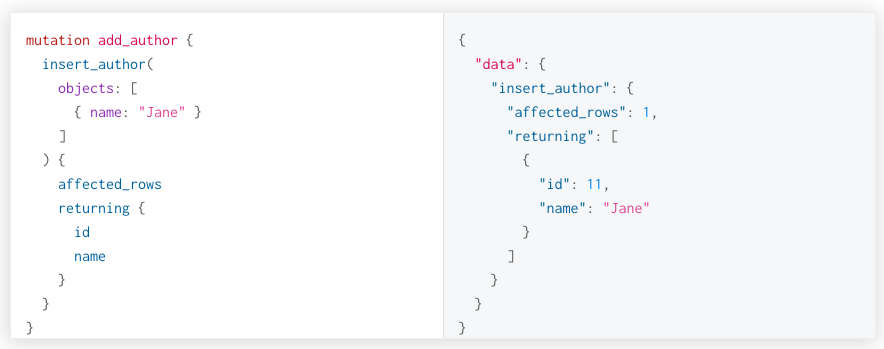
Query とその結果例を以下に示します。
Here are a couple of examples:
article テーブルの全ての row を取得する
Query all rows in the article table

author テーブルにデータをインサートする
Insert data in the author table

insert_author mutation の input に、author の id を与える必要はありません。なぜなら自動的に連番の整数が付与される設定になっているからです。
Note that the author’s id does not need to passed as an input as it is of type serial (auto incrementing integer).